Wednesday, November 6, 2013

The Nursery and the Glory of a Bedroom Door

38 weeks along.

Looks like I'm hiding a prize winning pumpkin under my shirt.

I can finally "nest" because the baby's room is finished! Wheeee!

My husband and my father in law have been spending most of their weekends over the past month trying to get everything taken care of in the nursery. Remember, this is an old house. Nothing is level, straight or at the proper 90 degree angle. It has been quite a challenge for them, but the results look great!

As mentioned in my last post, we were going to have some surprise artwork done in the room. Daniel's best friend Bryan is an amazing artist, and did a smashing job with what I asked him to paint.

I really enjoy the classic Winnie the Pooh books and art. Bryan took some of my favorite pictures straight from the books and painted them on the walls.

Piglet running with Eeyore's birthday present

Tigger and Roo playing with pine cones.

Pooh, Piglet and Christopher Robin playing Pooh Sticks
in the stream

Pooh saving his most precious possessions from the 
great flood in the 100 Acre Wood.

Pooh and the honey tree

Group shot of all the characters.

Love, love LOVE what Bryan was able to paint - such a talented guy! Many thanks to him for making the nursery completely unique.

Here are some pictures of the room itself.

Please take note of the wonderful straight door,
door trim and baseboard.

Dad and Daniel even managed to square out the windows 
so that they are square and no longer crooked!

Window overlooking the back yard. They
used some of the old baseboard from the
original house to form the frames in this room.
I sanded and planed and painted it - looks
much nicer now!

All this to say that we are pretty much ready for the baby to come. Ironic thing is that he won't be sleeping in the nursery right away; he'll be in our bedroom for a while. After all of that work in the nursery... well, at least it is ready to go.

Speaking of our bedroom....

We FINALLY have a bedroom door!
And the best part is that the door latches and locks!
I finished sanding and polyurethaning the door a few weeks
ago, and last weekend Daniel and Dad installed it.

I may be more excited about having a functioning bedroom
door than I am about the baby! We purchased reproduction
rim locks for all of our old doors, and I think that this one in
particular looks rather spectacular. Oh, and see that keyhole?
That is real. That is how our bedroom door locks. So. Cool.

That is about it for house projects until after the holidays (which are rapidly approaching, how did that year go by so quickly?!?). Dan and I will finish a few small things around the house before the baby arrives, but we're going to hold off on anything big until the new year. I think we're going to need some time to adjust to a wee one, not to mention that we'll probably be exhausted!


Wednesday, September 25, 2013

Almost Finished (Maybe?)!

Guys, believe it or not, our major house renovations are coming to a close! After nearly 18 months of trips to the hardware store, renting equipment, lots of DIY projects, blood, sweat and tears, we are nearing the end of our renovations. Though my Dad keeps reminding me that old houses are never really done, there is a definite sense of excitement about not having to replace any more floors or cut any more holes in the house for a long time.

Our upstairs bathroom floor is now finished! It is bittersweet, finishing the last of the tile - Daniel and I were achieving high levels of awesome when it came to installing our own tile, and now that we really have it down to a science, we're done.

Daniel and his brother put the first bunch of tiles down, 
then I stepped in to help finish when Aaron had to leave.

Voila! Sweet looking tile floor, complete with grout.

Interesting story here. While we were tiling the upstairs bath, Dan and I had to use our downstairs bathroom for 10 days or so. We had never used the shower in the downstairs bath until now. After two days of using the shower, we found that there was a leak somewhere in the wall containing the pipes, and the drywall was starting to disintegrate. Ugh. Now we're going to have to tear apart the shower downstairs. At least we found out about it now rather than over the holidays when we'll have a house full of people. Still, it was a pretty big bummer. Photos to come of that in another post.

My wonderful Mom-in-law decided that she wanted to start painting some of our rooms, so Daniel and I have spent a lot of time over the past few weeks holding up paint swatches and trying to choose some colors. I'm so grateful that she has put the time and effort into painting; we have some good looking rooms!

Dining room. Color is called "Colonial White." Nothing
super-colorful, but it really softens up the harsh white 
of the primer. Mom also painted the living room in the
same color, since the rooms are adjacent to each other.

Nursery painted a soft yellow called "Spice Delight." 
We went for a yellow color because we are having
some very special design painting done in here in the
next few months, and yellow worked well for what is
going to be done. More on this fun in another post :)

And speaking of nursery...

Wheee! Baby crib! My parents bought us this crib
as a gift for their first grandson. All we need now is
a mattress.

My parents-in-law bought us this dresser
for the wee one. It was made by a local
Amish carpenter.

We still have a few months to finish the nursery, so I'm sure I'll be putting up more pictures once a few more pieces come together. But it is definitely starting to look good.

Moving on to other rooms...

After 10 months with a plywood counter top, I finally have a real one!

Nothing fancy, just laminate...

...but I can clean it, and it looks amazing!

Daniel recently bought us a clothes washer and dryer. After some finangling and running of pipes and wires, my dad-in-law had them up and running for me. I no longer have to haul my pregnant self over to my in-laws house carrying baskets full of laundry - now it's just a quick trip down the stairs.


The cat doesn't know what to do with the new 
machines in his basement domain.


Last, but certainly not least....

We have some working bedroom doors...
kind of...
this one in particular still needs some framing on top.

We haven't put any knobs on yet, so
the doors don't latch. That's next week's
project. But they are up and give more
privacy than a curtain.

I have one more door to sand down and poly before it can go up. I've been working on and off with it for a few weeks, and it really is slow going; there are so many layers of paint to sand down! While I work on that, Daniel and my Dad in law will be finishing the door frames and putting in the rim locks for the nursery and spare room doors.

Our last big project sits in the garage, leaving barely enough room to park our car.

First, we had to clean out all of the junk from the 
past year of renovations.

Then we filled it up again with all of the baseboard
and window/door trim needed for the downstairs.

Dad in law ordered it from a local Amish woodworker.
It's solid oak, and will look stunning after we're done 
sanding and staining it.

That, my friends, will be our last major project in our home. Well, that and the shower downstairs that leaks :) Will it ever really be completed? Maybe not, but at some point in the near future Dan and I will be able to sit back and relax in a house that looks finished!


Tuesday, August 13, 2013

End Of Summer Projects

Daniel and I were reflecting on how far this house has come since last year; it's pretty incredible! Last August we were finishing the pipes and wires and waiting for the drywall to go up. How far we have come in one year! We're now putting the finishing touches on our forever home.
I picked these up at a yard sale for $0.50 each. I really liked them because of the cast iron frames and the old prints they contained. For fifty cents, I thought it would be worth a try to clean them up.

Before.

I read up on how to clean up cast iron pans, and tried to apply it to the frames.
1) Took an old toothbrush and white vinegar and brushed the frame. The low acidity in the vinegar was just enough to dissolve most of the rust.
2) Used a bit of steel wool for a few of the more stubborn spots. Use sparingly, since the cast iron can be ruined by too much steel wool.

Left side untreated, right side cleaned.

3) Oven to 350 degrees. Rubbed Crisco into the frame (really? Yes. The oil treats the cast iron and prevents it from rusting again by creating a barrier between the iron and the air.)
4) Bake for 30 minutes. Let cool. Rub down with clean towel.

Fini. Kinda proud of myself for not
destroying these, or the oven for that matter :)

Dan and Dad have patched up our garage and fixed the mess of mud between the house and garage. 

Hard at work.


One of the garage walls was eroding thanks to some huge roots and an improper drainage system. The wall was dug out a few months ago when the rest of the drainpipes were buried, so the men set about repairs. Cement and chicken wire filled the holes, and new french drains were put in the length of the garage.


Dad filled in the space between garage and porch with gravel and placed these cement slabs on top. It's already been tested by a few days of rain, and it is a vast improvement over puddles and three inches of mud! Now that this is done, we can work on the front yard a bit. We need to remove a stump and create a walkway from the driveway to the front porch. My mom and I are working on some designs to make everything work together. 

After many months of waiting, I finally have my linen shelves! I was able to unpack three attic boxes worth of towels, sheets, bathroom stuff and blankets. I'm pleased :)

Eventually, there will be a door in front of the shelves to make it a closet, but that can wait a little while.


I'm working on sanding down some old barn wood to make some shelves for our living room. We're putting a 6 ft. shelf over the top of the television to hold surround sound speakers and some pictures and knick-knacks. Gonna try the barn wood first, and if it doesn't work we'll try something else.
There is something pretty neat about
re-purposing old wood for new projects!

Speaking of old wood, I've finished up two more doors for our upstairs.


Three coats of polyurethane seemed to do the trick pretty well, though the doors do feel a bit more rough than the other one. I should have taken more time to sand them down. The door on the right has a bit of an odd color to it, almost as if the wood was bleached. I'm hoping we can make that one the closet door, and turn the odd side inward. 

We've received the hardware that we purchased for the old doors. I'm going to save those photos until the doors go up and are fully functional, but we are really pleased with how awesome they are going to look.

Next up: hanging doors, buying countertop (finally!) and getting started with our baseboard and window trim.

Monday, July 15, 2013

"Did We Slaughter A Goat In Here?" and Other Matters

Whew! Back from a week of camping in the Adirondacks, and we're back in full swing house mode!

While we were gone, our friendly neighborhood contractor came and fixed a few problems around the house. Most were not photo-worthy, however two of the changes he made are quite noteworthy. The stairs leading to the second story of our house were barely staying together, so he took the whole thing out and replaced it all.

Just to give you an idea of what the stairs
have looked like since we moved in.

What the contractor was able to do :)

What my mom-in-law and I were able
to do with some stain and polyurethane.

Sooooo much better, yes? The steps don't squeak or pop anymore; on the contrary, you are unable to hear anything moving up or down the stairs. We're not entirely done; I still need to put another coat of poly on the steps, and we need to fashion some trim pieces for the sides, but all of the major work has been completed on these. Dan and I are thinking about putting a strip of carpeting down the middle, mostly because he's worried about me falling down the steps while pregnant or (later on) carrying a child in my arms. He has a point, but I feel like it is a shame to cover up much of our beautiful new stairs. 

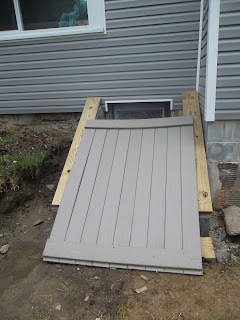
Our contractor was also able to fix our outside basement access. Currently, the door is rotted and not sealing, so when we get a good rain, water runs into the basement through the cracks in the door. We haven't replaced the door yet (need to special order one b/c it's an odd size), but Alan was able to build us a cement frame so we can get a bilco door of sorts over top of it.

We'll be getting the hinges and handle on 
next weekend. Looking forward to a 
basement that won't be so wet!

Dad-in-law put some glass panels in our Amish porch door. Not only do they look pretty, but they light up that whole corner of the house. Immediately opposite the door are our new stairs, and it is so nice to be able to see where to put your feet now! Not nearly the cave that it was before :)

So pretty!

All of these are things that other people have been doing to our house. What have I been doing? More staining and polyurethaning. Now before you cry foul and ask what I am doing 21 weeks pregnant using terrible chemicals, please know that I took every precaution, took many fresh air breaks and had the approval of the baby doctor before I began. Once the new stairs went in, we thought it would be best to get them stained and sealed as quickly as possible 1) to prevent any nasty permanent stains or marks and 2) to get it done before I got to big to do it! And while we were at it, Daniel and I decided that it would be a good time to stain the bathroom doors we had already hung on the master bathroom. After a few days of testing colors to see what might work best with our "fire floors" upstairs, we chose a color and I began my work. 

Before.

After.

Once again, I'm not quite done with these yet. The door on the left only has one coat of poly, and the door on the right has two coats. I'm shooting for three coats on each to help tone down the red color with a little bit of brown - so far so good. We are also thankful that we've waited to tile this floor because after using all that red stain and poly, the cardboard floor looks like we performed blood sacrifices in the bathroom.

Up next week; more of the same. I'll be finishing the stairs and bathroom doors, and hopefully moving on to sanding down the old bedroom doors we just got back from Lark. Gotta make sure this baby has a room with a door to move into when he arrives!

Sunday, June 23, 2013

Bits And Pieces

June has rolled around again, and with it has come the summer heat. We're getting the ball rolling on some summer projects, both indoor and outdoor.

This weekend we played a game of "Where is the septic tank?" with a backhoe. We had no clue where it was, and the pipes coming out of the house were not much help in indicating a direction. It was eventually found, but not before turning a good 30 feet behind the house from grass to dirt. All of the rock picking over the past month was for naught. My heart broke a little.


We were also able to discover the reason for the large wet spot in the lawn, right where the chicken coop was buried. Turns out the grey water pipe for the septic ran UNDER the coop, and when it was buried, the pipe broke and leaked a lot of water on the surface. Many thanks to our friends in the backhoe who found the pipe and dug a new leech field for us! No more stanky water in the yard!

And since they were there for the day, we were able to get our drain spout pipes buried in the lawn. Now when it rains, the water will run off into the yard and gravel beds, instead of into the basement.


The last thing we did (again, with the help of heavy machinery), was dig a 100 foot long trench from our well to the barn. Dave wanted to run electric and water to the barn so that someday we can rent out boarding and pasture space for horses.


Now we'll just need to plant grass seed everywhere, and pray that it can get established before autumn comes!

Speaking of planting...

Garden, hurray! I've got beans, broccoli, 
beets, cucumbers, zucchini, and peas.


Daniel and I were able to finish the tile in our downstairs bathroom in one weekend. Such a difference from working on the kitchen floor!


It really is a tiny room - not more than 30 square feet.
We both liked the marble white/grey tile with purple accent
rugs. It turned out pretty well!

All the bathroom needs now is a coat of paint and some baseboard, and it will be officially complete. Hopefully we'll get it done before the baby comes in November! We still have one more major tiling project; the master bathroom. Admittedly, I am putting it off for a little while because I am thoroughly sick of laying tile, but we're gonna have to do it in the next few months.

I've been working on a door for one of the upstairs rooms. Since I am pregnant, I'm not allowed to use paint stripper on the doors, so we've been taking them to a local company that strips the old paint of and passes them back to us. I could not believe what a nice job they did!

From doors with 3-5 layers of lead paint...

To beautiful hardwood with polyurethane. 
I am in love with my old doors!

I've been working on this one for a few weeks, on and off. I sanded it, front and back twice and then put three coats of poly on it. I can't wait to get the rest of the doors back so I can make them look just as awesome! I'm also on the hunt for some restoration rim locks to use as latches. Maybe next time I post, I'll be able to show you a completed door, hanging in one of the bedrooms.

Dan and I will be in the Adirondacks for a brief vacation in the next few weeks. While we are gone, we've got our old contractor coming in to do a few projects, and I'll be sure to post some before/after photos of his work.